ZStack v1.0 release
Hello everyone, I am Frank Zhang, the architect of ZStack. Today I am happy to announce that ZStack v1.0 is released.
New Features
- Flat Network Provider, providing distributed DHCP
- User Data, supporting cloud-init
- Volume Migration on Local Storage
- ISO APIs, supporting attach/detach ISO and change VM boot order
- Spice
- i18n, English/Chinese PRC/Chinese Taiwan
- VM State Realtime Syncing
- Resource Deletion Policy
- CPU model pass-through, supporting nested-virtualization
- 22M Tiny Image
Installation And Upgrade
1. Flat Network Provider
A new network provider, flat network provider, which provides DHCP, Userdata services is available for users only using flat networks. Compared to the virtual router provider, the main advantage of the new provider is you don't need a virtual router VM for DHCP server anymore, which simplifies the effort of deploying a flat network significantly.

The flat network provider contains a distributed DHCP system that runs a DHCP server serving DHCP requests from VMs on the local KVM host. Compared to the traditional DHCP system that has only one DHCP server, the distributed DHCP system has no single failure point, and a DHCP server down only effects VMs on one host. Large DHCP requests originated from concurrent VMs creation/starting are balanced to different DHCP servers, which improves the overall concurrency.
1.1 Use Flat Network Provider
When you create a L3 network, do following steps when selecting network services:
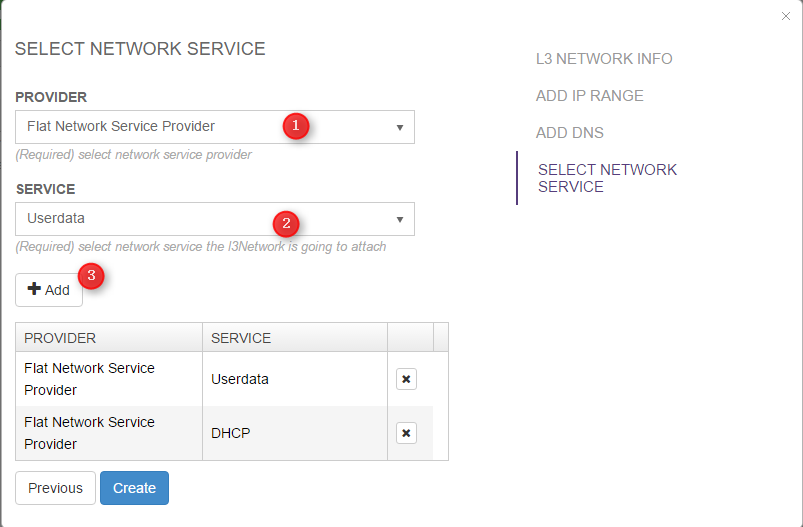
- select provider as “Flat Network Service Provider”
- select service DHCP
- click button “Add”
- repeat step 2, 3 to add service Userdata
You can combine flat network provider and virtual router provider
The flat network provider is mainly for flat networks which only require DHCP service. However, you can combine it with the virtual router provider for a mixed setup. For example, use the flat network provider for DHCP service and use the virtual router provider for SNAT and EIP services.User Data
User data, complying the standard of cloud-init, is enabled by the userdata service of the flat network provider.
Your template must install cloud-init package
To use the user data, you must install cloud-init package in the VM’s operating system.The userdata is implemented by ZStack’s system tag mechanism; you can use system tag APIs to add/update/remove userdata to VMs.
The format of userdata system is like:
    userdata::{the content}

    Example:

    userdata::groups:\n  - ubuntu: [foo,bar]\n  - cloud-users\n\n# Add users to the system. Users are added after groups are added.\nusers:\n  - default\n  - name: foobar\n    gecos: Foo B. Bar\n    primary-group: foobar\n    groups: users\n    selinux-user: staff_u\n    expiredate: 2012-09-01\n    ssh-import-id: foobar\n    lock-passwd: false\n  - name: barfoo\n    gecos: Bar B. Foo\n    sudo: ALL=(ALL) NOPASSWD:ALL\n    groups: users, admin\n    ssh-import-id: None\n    lock-passwd: true\n    ssh-authorized-keys:\n      - <ssh pub key 1>\n      - <ssh pub key 2>\n  - name: cloudy\n    gecos: Magic Cloud App Daemon User\n    inactive: true\n    system: true
Minify the cloud-init YAML configuration
cloud-init uses a YAML file as user data. As a ZStack system tag is a string, you need to minify the YAML file before passing to ZStack's API. Here is simple script to do that:sed ':a;N;$!ba;s/\n/\\n/g' the_yaml_file
The output will be printed on the screen.
2.1 Use user data
2.1.1 Configure cloud-init in VM
To use use data, you need to first configure cloud-init in your VM. We suggest you doing this once then saving the VM as a template so VMs derived from the template will have cloud-init installed by default.
- yum install cloud-init or apt-get install cloud-init
add following content to /etc/cloud/cloud.cfg
datasource_list:
  - CloudStack
2.2.2 Add user data
You can specify user data when creating a new VM, for example:
CreateVmInstance name=vm imageUuid=d720ff0c60ee48d3a2e6263dd3e12c33 instanceOfferingUuid=76789b62aeb542a5b4b8b8488fbaced2 l3NetworkUuids=37d3c4a1e2f14a1c8316a23531e62988,05266285f96245f096f3b7dce671991d defaultL3NetworkUuid=05266285f96245f096f3b7dce671991d systemTags='userdata::groups:\n - ubuntu: [foo,bar]\n - cloud-users\n\n# Add users to the system. Users are added after groups are added.\nusers:\n - default\n - name: foobar\n gecos: Foo B. Bar\n primary-group: foobar\n groups: users\n selinux-user: staff_u\n expiredate: 2012-09-01\n ssh-import-id: foobar\n lock-passwd: false\n - name: barfoo\n gecos: Bar B. Foo\n sudo: ALL=(ALL) NOPASSWD:ALL\n groups: users, admin\n ssh-import-id: None\n lock-passwd: true\n ssh-authorized-keys:\n - <ssh pub key 1>\n - <ssh pub key 2>\n - name: cloudy\n gecos: Magic Cloud App Daemon User\n inactive: true\n system: true'
To set the user data to an existing VM, use CreateSystemTag, for example:
CreateSystemTag resourceUuid=303bf80af28c4e23b9b8c20d4267356b resourceType=VmInstanceVO tag='userdata::groups:\n - ubuntu: [foo,bar]\n - cloud-users\n\n# Add users to the system. Users are added after groups are added.\nusers:\n - default\n - name: foobar\n gecos: Foo B. Bar\n primary-group: foobar\n groups: users\n selinux-user: staff_u\n expiredate: 2012-09-01\n ssh-import-id: foobar\n lock-passwd: false\n - name: barfoo\n gecos: Bar B. Foo\n sudo: ALL=(ALL) NOPASSWD:ALL\n groups: users, admin\n ssh-import-id: None\n lock-passwd: true\n ssh-authorized-keys:\n - <ssh pub key 1>\n - <ssh pub key 2>\n - name: cloudy\n gecos: Magic Cloud App Daemon User\n inactive: true\n system: true'
The resourceUuid here is the VM's uuid.
2.2.3 Get user data
You can use QuerySystemTag to get user data, for example:
QuerySystemTag resourceUuid=303bf80af28c4e23b9b8c20d4267356b tag~=userdata%
The resourceUuid here is the VM's uuid.
2.2.4 Remove user data
You can use DeleteTag to remove user data from a VM:
    DeleteTag uuid=user_data_tag_uuid
    For example:
    DeleteTag uuid=7813d03bb85840c489789f8df3a5915b
See above section for retrieving UUID of user data tag.
2.2.5 Update user data
You can use UpdateSystemTag to update existing user data of a VM, for example:
UpdateSystemTag uuid=762c3047e05f471ea3fce13f808a50be tag='userdata::groups:\n - ubuntu: [foo,bar]\n - cloud-users\n\n# Add users to the system. Users are added after groups are added.\nusers:\n - default\n - name: foobar\n gecos: Foo B. Bar\n primary-group: foobar\n groups: users\n selinux-user: staff_u\n expiredate: 2012-09-01\n ssh-import-id: foobar\n lock-passwd: false\n - name: barfoo\n gecos: Bar B. Foo\n sudo: ALL=(ALL) NOPASSWD:ALL\n groups: users, admin\n ssh-import-id: None\n lock-passwd: true\n ssh-authorized-keys:\n - <ssh pub key 1>\n - <ssh pub key 2>\n - name: cloudy\n gecos: Magic Cloud App Daemon User\n inactive: true\n system: true'
The uuid here is the system tag's UUID. See above section for retrieving UUID of user data tag.
2.2.6 Inject SSH public key into a VM
As public SSH key injection is a widely used feature for user data, ZStack provides a shortcut system tag for this. The system tag is in format of:
    sshkey::{content}
    Example:
    sshkey::ssh-rsa AAAAB3NzaC1yc2EAAAADAQABAAABAQC5x3AoWuiZawxXoBxEcOhhdVAST4kJA/cQ2zGnh3yZ/KBU+VILQHTkbNWAaRw3q0UtfpLfVj/KoPFr43qjGF+ud8B/rD7stsAvbNVdms81aBDAFZyiN7dhlwTK+XvCMhl4RxHUItm7+Y7gzb8jTHPoqlPzAw4r8enqhNf9ABG+kaXIDa0FPhVaMPoLzHWjTe34ONIBlxsY/y1Zle49vPVYS7oAHQTc7ly7bnGXffNJ18uF5M7HPUgsIDum8KICa2LmnXJeB2M9XZtXtJUdR1ZKXeQpRtikAm3G3CwFkDxWnx31dGr0lLa2aZ88LQ2iP8nb2NK58aKb4I9Aq19k44Rl root@yyy
2.2.7 Add public SSH key
You can do this when you creating a VM, for example:
CreateVmInstance name=vm imageUuid=d720ff0c60ee48d3a2e6263dd3e12c33 instanceOfferingUuid=76789b62aeb542a5b4b8b8488fbaced2 l3NetworkUuids=37d3c4a1e2f14a1c8316a23531e62988,05266285f96245f096f3b7dce671991d defaultL3NetworkUuid=05266285f96245f096f3b7dce671991d systemTags='sshkey::ssh-rsa AAAAB3NzaC1yc2EAAAADAQABAAABAQC5x3AoWuiZawxXoBxEcOhhdVAST4kJA/cQ2zGnh3yZ/KBU+VILQHTkbNWAaRw3q0UtfpLfVj/KoPFr43qjGF+ud8B/rD7stsAvbNVdms81aBDAFZyiN7dhlwTK+XvCMhl4RxHUItm7+Y7gzb8jTHPoqlPzAw4r8enqhNf9ABG+kaXIDa0FPhVaMPoLzHWjTe34ONIBlxsY/y1Zle49vPVYS7oAHQTc7ly7bnGXffNJ18uF5M7HPUgsIDum8KICa2LmnXJeB2M9XZtXtJUdR1ZKXeQpRtikAm3G3CwFkDxWnx31dGr0lLa2aZ88LQ2iP8nb2NK58aKb4I9Aq19k44Rl root@yyy'
or add the SSH key to an existing VM, for example:
CreateSystemTag resourceType=VmInstanceVO resourceUuid=606d9a2fa723407c93438789eaf72cea tag="sshkey::ssh-rsa AAAAB3NzaC1yc2EAAAADAQABAAABAQDdlfgEu4SmgAXaEhLtNljm4cqowdFSyOH7NtheqzZROaRNRJOYKCABUZLmsLv1pl3Av+m1vUUILPWNymxdCnhuaxl/vFtvyWrLChKR8s2Cpl24uFpvHaWO6JLd/RnSwj8LCsCreJ3Twq77T9MCwDVl15WNjn3WKuPfFKxmW7gQTDyDK1XX35n7RYSadurdVNmJTAsQWmszmGeBDVO6U7spRtH7nNrNAMVjaOHrPp5NbMRBVCyHfj1UY71bnIdVCa2mY/RtjIkcj4JNBaQ0JPnP1jw4Ig8WVkjn74T7U4chUHmu8jzwhv+++F7EGLSNdb85RKmY5IdHDd+dRuK3Rx67 root@bji-bm-node3"
2.2.8 Get public SSH key
You can use QuerySystemTag to get SSH key, for example:
QuerySystemTag resourceUuid=303bf80af28c4e23b9b8c20d4267356b tag~=sshkey%
The resourceUuid here is the VM's uuid.
2.2.9 Remove public SSH key
You can use DeleteTag to remove SSH key from a VM:
    DeleteTag uuid=user_data_tag_uuid
    For example:
    DeleteTag uuid=7813d03bb85840c489789f8df3a5915b
See above section for retrieving UUID of SSH key tag.
2.2.10 Update public SSH key
You can use UpdateSystemTag to update the existing SSH key of a VM, for example:
UpdateSystemTag uuid=762c3047e05f471ea3fce13f808a50be tag='sshkey::ssh-rsa AAAAB3NzaC1yc2EAAAADAQABAAABAQDdlfgEu4SmgAXaEhLtNljm4cqowdFSyOH7Nthe qzZROaRNRJOYKCABUZLmsLv1pl3Av+m1vUUILPWNymxdCnhuaxl/vFtvyWrLChKR8s2Cpl24uFpvHaWO6JLd/RnSwj8LCsCreJ3Twq77T9MCwDVl15WNjn3WKuPfFKxmW7gQTDyDK1XX35n7RYSadurdVNmJTAsQWmszmGeBDVO6U7spRtH7nNrNA MVjaOHrPp5NbMRBVCyHfj1UY71bnIdVCa2mY/RtjIkcj4JNBaQ0JPnP1jw4Ig8WVkjn74T7U4chUHmu8jzwhv+++F7EGLSNdb85RKmY5IdHDd+dRuK3Rx67 root@bji-bm-node3'
The uuid here is the system tag's UUID. See above section for retrieving UUID of SSH key tag.
You may need to reboot the VM to enable the SSH key
If you add/update a SSH key to an existing VM, you need to do following steps:1. clean up existing cloud-init data by 'rm -rf /var/lib/cloud' in the VM's operating system
2. reboot the VM
For creating new VM, you don't need to do this.
3. Volume Migration For Local Storage
In this version, you can migrate volumes between different hosts on local primary storage. This mainly solves the problem that VMs cannot be migrated when using local primary storage.
3.1 Migrate Volumes
You can use LocalStorageMigrateVolume to migrate both root volumes and data volumes, for example:
LocalStorageMigrateVolume volumeUuid=cdbda88fef1a42f386ff111b729159d9 destHostUuid=252d484d93e64fea946148097162b60f
3.2 Migration Rules
- If the volume is a root volume, the VM of the root volume must be stopped
- If the volume is a data volume, it must be detached
- If there are snapshots of the volume, snapshots are migrated as well
Migrating a VM by migrating its root volume
If you want to migrate a VM to another host when using local primary storage. You can do following steps:1. stop the VM
2. migrate the VM's root volume to the destination host
3. start the VM
4. ISO API
In this version, you can use APIs to attach/detach ISO to/from a VM, and can use APIs to set/get VM's boot device order
4.1 Attach ISO
You can use AttachIsoToVmInstance to attach an ISO to a VM, for example:
AttachIsoToVmInstance vmInstanceUuid=d4a83b0394b44482bbcb964b4dbe991c isoUuid=815dcd3d83dd429298ba2c9b1685c1ad
4.2 Detach ISO
You can use DetachIsoFromVmInstance to detach the ISO from a VM, for example:
DetachIsoFromVmInstance vmInstanceUuid=d4a83b0394b44482bbcb964b4dbe991c
4.3 Get VM's boot device order
You can use GetVmBootOrder to get the boot device order of a VM, for example:
GetVmBootOrder uuid=303bf80af28c4e23b9b8c20d4267356b
The uuid here is the VM's UUID.
4.4 Set VM's boot device order
You can use SetVmBootOrder to set the boot device order of a VM, for example:
SetVmBootOrder uuid=303bf80af28c4e23b9b8c20d4267356b bootOrder=HardDisk,CdRom
The uuid here is the VM's UUID.
Note: the valid boot devices are: HardDisk and CdRom
4.5 Boot Device Order Rules
- For VMs created from an ISO, the default boot device is set to CdRom. Once you finish installing the operating system and reboot the VM, the boot device is changed to HardDisk
- For VMs created from a template, the default boot device is HardDisk
- Attaching an ISO to an existing VM won't change its boot device order, you need to use
SetVmBootOrderto change it explicitly if you want
5. Spice Support
You can use Spice protocol to access a VM console in this version. To enable the spice protocol, do following:
UpdateGlobalConfig category=kvm name=vm.consoleMode value=spice
valid values: vnc and spice
ZStack doesn't have a spice console proxy for now. To access a VM's console, you need to use a Spice client to connect to VM's spice port on the host. The port and the host's IP
can be obtained by the API GetVmConsoleAddress:
    >>>GetVmConsoleAddress uuid=9cd68155905e47b5b0698ecba9126242
    {
        "hostIp": "192.168.199.136",
        "port": 5902,
        "protocol": "spice",
        "success": true
    }
Here the parameter uuid is the UUID of the VM you want to access. Thanks Nan Su(fengcai_ji@163.com) from Wuhan Textile University for contributing this feature!
I18n Support
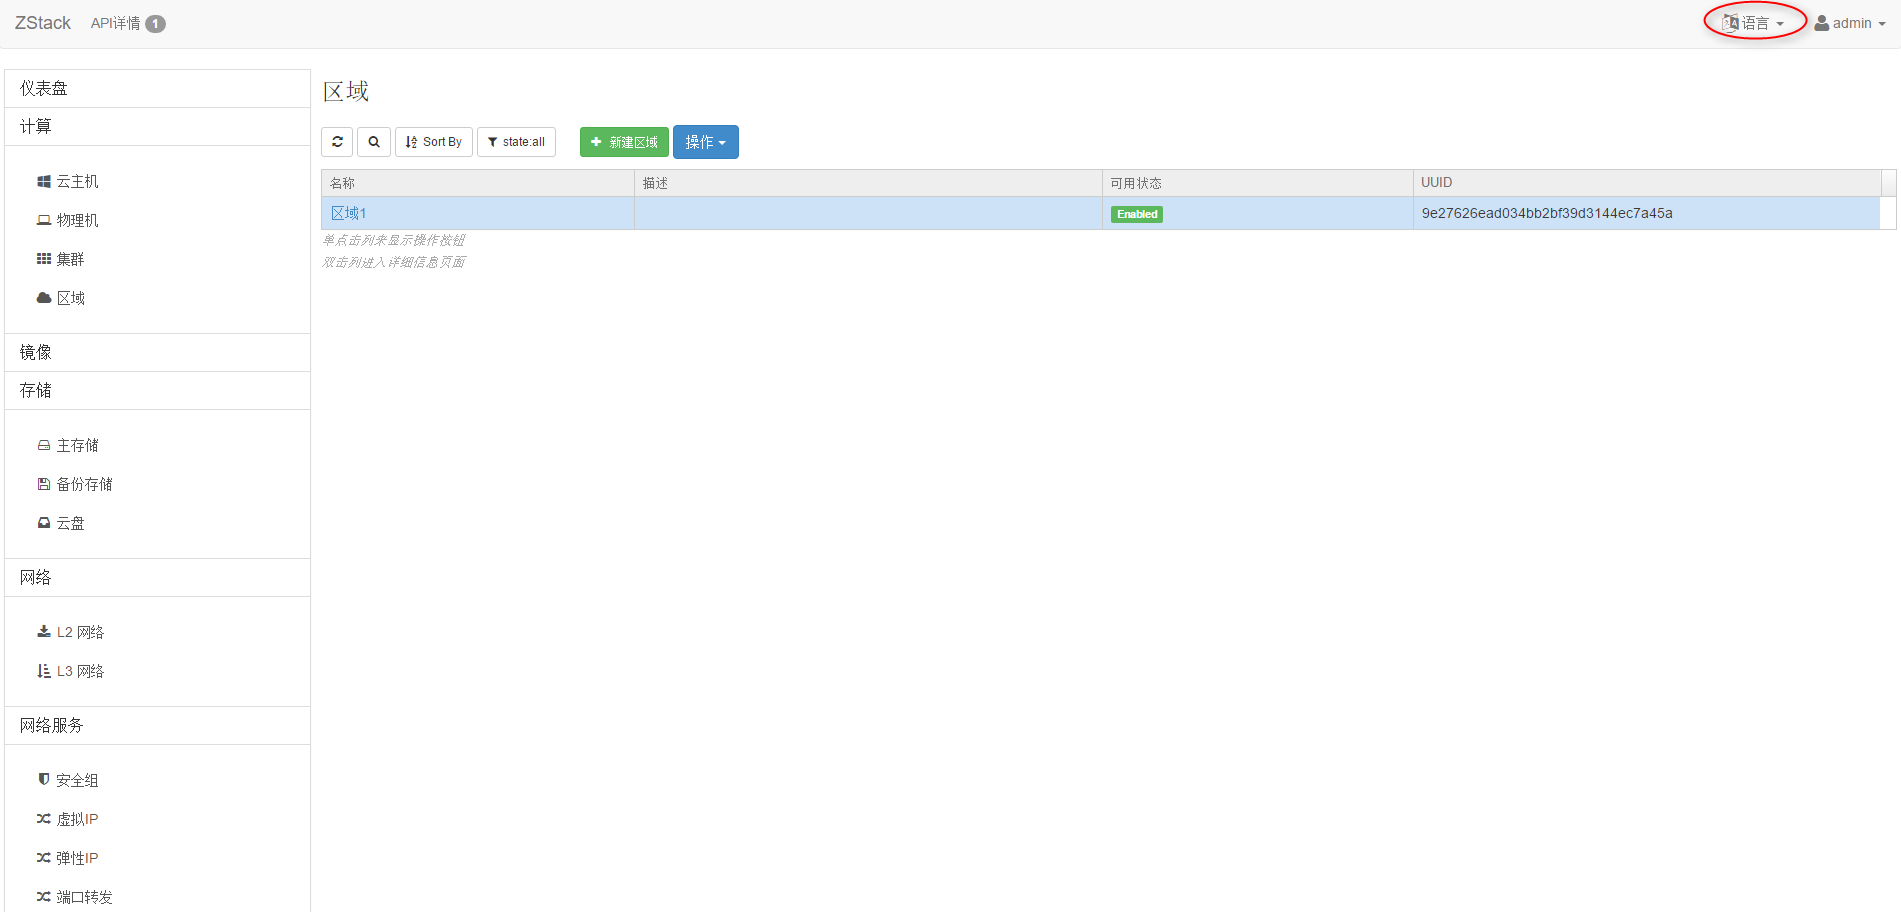
The i18n is supported in the new UI. You can switch between languages of English/Chinese PRC/Chinese Taiwan by clicking the language button.
Thanks Nan Su(fengcai_ji@163.com), Zhiqiang Hu(1063751150@qq.com)u Qi Wei(804470533@qq.com), Yu Chen(ppak@sohu.com), Wanling Xue(1962670706@qq.com) from Wuhan Textile University for contributing this feature!
Thanks BaiYun Tech Taiwan for contributing the language of Chinese Taiwan support!
7. Realtime VM State Syncing
In this version, ZStack will sync VMs' state realtime; that is to say, you can use virsh command(even not recommended) to control VMs' life cycle or shutdown a VM by typing halt
command in the guest operating system; ZStack will detect the state change and sync it to the database realtime.
8. Resource Deletion Policy
Beginning at this version, you can set deletion policies on core resources including VMs, images, and volumes, to avoid accidental deletion. There are three polices: Direct, Delay, and Never, and the default one is Delay
8.1 The rule
- Direct: resources are deleted directly from the physical devices, no way to recover
- Delay: resources are marked as
Deletedin the database and will be physically expunged after a configurable period. Before being expunged, you can recover the resource anytime - Never: resources are marked as
Deletedonly and will never be expunged
8.2 VM deletion policy
You can change the deletion policy of VMs by doing:
UpdateGlobalConfig category=vm name=deletionPolicy value=Direct
If the policy is Delay, you can specify the delay period by doing:
UpdateGlobalConfig category=vm name=expungePeriod value=3600
the value is in seconds. The default delay is 24 hours
You can also configure the interval that ZStack checks expunging candidates, do:
UpdateGlobalConfig category=vm name=expungeInterval value=3600
the value is in seconds
You can recover a deleted VM by:
RecoverVmInstance vmInstanceUuid=8c4c4c0bbac7441fb056d0d6e2168996
8.3 Image deletion policy
You can change image deletion policies too:
     UpdateGlobalConfig category=image name=deletionPolicy value=Direct
     UpdateGlobalConfig category=image name=expungePeriod value=3600
     UpdateGlobalConfig category=image name=expungeInterval value=3600
and recover a deleted image:
RecoverImage imageUuid=8c4c4c0bbac7441fb056d0d6e2168996
You can recover an image on specified backup storage:
RecoverImage imageUuid=8c4c4c0bbac7441fb056d0d6e2168996 backupStorageUuids=36c27e8ff05c4780bf6d2fa65700f22e
8.4 Volume deleted policy
You can change data volume deletion policies:
    UpdateGlobalConfig category=volume name=deletionPolicy value=Direct
    UpdateGlobalConfig category=volume name=expungePeriod value=3600
    UpdateGlobalConfig category=volume name=expungeInterval value=3600
You can recover a deleted data volume:
RecoverDataVolume uuid=36c27e8ff05c4780bf6d2fa65700f22e
root volumes are recovered when you recover VMs
9. Host CPU model pass-through ( Nested Virtualization Support)
You can change a global configuration to let VMs get hosts' CPU model. For example:
UpdateGlobalConfig category=kvm name=vm.cpuMode value=host-model
Valid values are: none, host-model, host-passthrough. The default value is
none
Set this configuration to host-model or host-passthrough can enable nested virtualization in the VM.
This may break live migration
Because live migration will check the CPU model, setting this value tohost-model or host-passthrough may
break live migration if CPU models are different on two hosts.
10. 22M Tiny Image
We build a tiny image that supports SSHD and ACPID, which can do graceful stop when you stop the VM through ZStack UI. The image locates at
http://download.zstack.org/templates/zstack-image-0.0.7.qcow2
You can download it for quick test. Thanks Robert Yang(@linuxer) for contributing this feature!
11. Installation
You can install the RC1 release by:
    wget http://download.zstack.org/releases/1.0/1.0.0/zstack-installer-1.0.0-0201.bin -O zstack-installer-1.0.0-0201.bin
    bash zstack-installer-1.0.0-0201.bin -R aliyun
12. Upgrade
To upgrade your ZStack to 1.0, do:
    wget http://download.zstack.org/releases/1.0/1.0.0/zstack-installer-1.0.0-0201.bin -O zstack-installer-1.0.0-0201.bin
    bash zstack-installer-1.0.0-0201.bin -u
13. Upgrade Virtual Router Provider To Flat Network Provider
If you are currently using a flat network with a previous ZStack version, you can upgrade the L3 network using the flat network provider so you won't need the virtual router VM anymore. Assume the UUID of your L3 network is 1a82c2691978476fa6cefa36bb9d4bfd, please follow the below steps:
1. Obtain the UUID of the virtual rotuer provider
    >>>QueryNetworkServiceL3NetworkRef l3NetworkUuid=1a82c2691978476fa6cefa36bb9d4bfd
    {
        "inventories": [
            {
                "l3NetworkUuid": "1a82c2691978476fa6cefa36bb9d4bfd",
                "networkServiceProviderUuid": "5d21ea0f39c04d6fb68cfaf5a37db4ad",
                "networkServiceType": "DNS"
            },
            {
                "l3NetworkUuid": "1a82c2691978476fa6cefa36bb9d4bfd",
                "networkServiceProviderUuid": "5d21ea0f39c04d6fb68cfaf5a37db4ad",
                "networkServiceType": "DHCP"
            }
        ],
        "success": true
    }
2. Detach the virtual router provider from the L3 network
        >>>DetachNetworkServiceFromL3Network  l3NetworkUuid=1a82c2691978476fa6cefa36bb9d4bfd networkServices='{"5d21ea0f39c04d6fb68cfaf5a37db4ad":["DHCP","DNS"]}'
         {
             "inventory": {
                 "createDate": "Jan 30, 2016 3:01:03 PM",
                 "dns": [
                     "8.8.8.8"
                 ],
                 "ipRanges": [
                     {
                         "createDate": "Jan 30, 2016 3:01:04 PM",
                         "endIp": "192.168.201.199",
                         "gateway": "192.168.200.1",
                         "l3NetworkUuid": "1a82c2691978476fa6cefa36bb9d4bfd",
                         "lastOpDate": "Jan 30, 2016 3:01:04 PM",
                         "name": "ipr-dk7p",
                         "netmask": "255.255.252.0",
                         "startIp": "192.168.201.180",
                         "uuid": "ec5fd87dd80243fdabeeace847c04427"
                     }
                 ],
                 "l2NetworkUuid": "9ec8cad681d1424fa7eda2447edae142",
                 "lastOpDate": "Jan 30, 2016 3:01:03 PM",
                 "name": "l3-etpz",
                 "networkServices": [],
                 "state": "Enabled",
                 "system": false,
                 "type": "L3BasicNetwork",
                 "uuid": "1a82c2691978476fa6cefa36bb9d4bfd",
                 "zoneUuid": "4a3a78b1b9f049948b79cf9e667f0af2"
             },
             "success": true
         }
the parameter
networkServicesis a map where the key is anetworkServiceProviderUuidand the value is a list ofnetworkServiceType, which you obtain in the step 1
3. Get the flat network provider UUID
        >>>QueryNetworkServiceProvider type=Flat
        {
            "inventories": [
                {
                    "attachedL2NetworkUuids": [
                        "9ec8cad681d1424fa7eda2447edae142"
                    ],
                    "createDate": "Jan 30, 2016 11:56:32 AM",
                    "description": "Flat Network Service Provider",
                    "lastOpDate": "Jan 30, 2016 11:56:32 AM",
                    "name": "Flat Network Service Provider",
                    "networkServiceTypes": [
                        "DHCP",
                        "Userdata"
                    ],
                    "type": "Flat",
                    "uuid": "17864f985e584a9ba4cd81de215212ce"
                }
            ],
            "success": true
        }
4. Get L2 UUID for the L3 network
        >>>QueryL3Network fields=l2NetworkUuid, uuid=1a82c2691978476fa6cefa36bb9d4bfd
        {
            "inventories": [
                {
                    "l2NetworkUuid": "9ec8cad681d1424fa7eda2447edae142"
                }
            ],
            "success": true
        }
5. Attach the flat network provider to the L2 network
       >>>AttachNetworkServiceProviderToL2Network l2NetworkUuid=9ec8cad681d1424fa7eda2447edae142 networkServiceProviderUuid=17864f985e584a9ba4cd81de215212ce
       {
           "inventory": {
               "attachedL2NetworkUuids": [
                   "9ec8cad681d1424fa7eda2447edae142"
               ],
               "createDate": "Jan 30, 2016 11:56:32 AM",
               "description": "Flat Network Service Provider",
               "lastOpDate": "Jan 30, 2016 11:56:32 AM",
               "name": "Flat Network Service Provider",
               "networkServiceTypes": [
                   "DHCP",
                   "Userdata"
               ],
               "type": "Flat",
               "uuid": "17864f985e584a9ba4cd81de215212ce"
           },
           "success": true
       }
6. Attach the flat network provider to the L3 network
     >>>AttachNetworkServiceToL3Network l3NetworkUuid=1a82c2691978476fa6cefa36bb9d4bfd networkServices='{"17864f985e584a9ba4cd81de215212ce":["DHCP","Userdata"]}'
      {
          "inventory": {
              "createDate": "Jan 30, 2016 3:01:03 PM",
              "dns": [
                  "8.8.8.8"
              ],
              "ipRanges": [
                  {
                      "createDate": "Jan 30, 2016 3:01:04 PM",
                      "endIp": "192.168.201.199",
                      "gateway": "192.168.200.1",
                      "l3NetworkUuid": "1a82c2691978476fa6cefa36bb9d4bfd",
                      "lastOpDate": "Jan 30, 2016 3:01:04 PM",
                      "name": "ipr-dk7p",
                      "netmask": "255.255.252.0",
                      "startIp": "192.168.201.180",
                      "uuid": "ec5fd87dd80243fdabeeace847c04427"
                  }
              ],
              "l2NetworkUuid": "9ec8cad681d1424fa7eda2447edae142",
              "lastOpDate": "Jan 30, 2016 3:01:03 PM",
              "name": "l3-etpz",
              "networkServices": [
                  {
                      "l3NetworkUuid": "1a82c2691978476fa6cefa36bb9d4bfd",
                      "networkServiceProviderUuid": "17864f985e584a9ba4cd81de215212ce",
                      "networkServiceType": "DHCP"
                  },
                  {
                      "l3NetworkUuid": "1a82c2691978476fa6cefa36bb9d4bfd",
                      "networkServiceProviderUuid": "17864f985e584a9ba4cd81de215212ce",
                      "networkServiceType": "Userdata"
                  }
              ],
              "state": "Enabled",
              "system": false,
              "type": "L3BasicNetwork",
              "uuid": "1a82c2691978476fa6cefa36bb9d4bfd",
              "zoneUuid": "4a3a78b1b9f049948b79cf9e667f0af2"
          },
          "success": true
      }
7. Delete the virtual router VM
        >>QueryVirtualRouterVm
         {
             "inventories": [
                 {
                     "allVolumes": [
                         {
                             "createDate": "Jan 30, 2016 3:06:50 PM",
                             "description": "Root volume for VM[uuid:c5a966cb87d644649952daf683f89e26]",
                             "deviceId": 0,
                             "format": "qcow2",
                             "installPath": "/zstack_ps/rootVolumes/acct-36c27e8ff05c4780bf6d2fa65700f22e/vol-8eeaa9cb4c1045a2825f8815fed69d72/8eeaa9cb4c1045a2825f8815fed69d72.qcow2",
                             "lastOpDate": "Jan 30, 2016 3:06:59 PM",
                             "name": "ROOT-for-virtualRouter.l3.1a82c2691978476fa6cefa36bb9d4bfd",
                             "primaryStorageUuid": "4bff4e2d266f480ead596752d14ff3b5",
                             "rootImageUuid": "7bed05aa8ace4e5e8d6c55b284b66fb5",
                             "size": 467206656,
                             "state": "Enabled",
                             "status": "Ready",
                             "type": "Root",
                             "uuid": "8eeaa9cb4c1045a2825f8815fed69d72",
                             "vmInstanceUuid": "c5a966cb87d644649952daf683f89e26"
                         }
                     ],
                     "allocatorStrategy": "LeastVmPreferredHostAllocatorStrategy",
                     "applianceVmType": "VirtualRouter",
                     "clusterUuid": "10409d3e33b249c19746022930a541c7",
                     "cpuNum": 1,
                     "cpuSpeed": 2,
                     "createDate": "Jan 30, 2016 3:06:50 PM",
                     "defaultRouteL3NetworkUuid": "1a82c2691978476fa6cefa36bb9d4bfd",
                     "hostUuid": "415fa093b34e4a3d873368104b127115",
                     "hypervisorType": "KVM",
                     "imageUuid": "7bed05aa8ace4e5e8d6c55b284b66fb5",
                     "instanceOfferingUuid": "9cec7bd6324445a184351ffb7d32f970",
                     "lastHostUuid": "415fa093b34e4a3d873368104b127115",
                     "lastOpDate": "Jan 30, 2016 3:07:20 PM",
                     "managementNetworkUuid": "1a82c2691978476fa6cefa36bb9d4bfd",
                     "memorySize": 536870912,
                     "name": "virtualRouter.l3.1a82c2691978476fa6cefa36bb9d4bfd",
                     "platform": "Linux",
                     "publicNetworkUuid": "1a82c2691978476fa6cefa36bb9d4bfd",
                     "rootVolumeUuid": "8eeaa9cb4c1045a2825f8815fed69d72",
                     "state": "Running",
                     "status": "Connected",
                     "type": "ApplianceVm",
                     "uuid": "c5a966cb87d644649952daf683f89e26",
                     "vmNics": [
                         {
                             "createDate": "Jan 30, 2016 3:06:50 PM",
                             "deviceId": 0,
                             "gateway": "192.168.200.1",
                             "ip": "192.168.201.195",
                             "l3NetworkUuid": "1a82c2691978476fa6cefa36bb9d4bfd",
                             "lastOpDate": "Jan 30, 2016 3:06:50 PM",
                             "mac": "fa:4c:01:68:77:00",
                             "metaData": "7",
                             "netmask": "255.255.252.0",
                             "uuid": "c44e856aa88a42bc85ec30ce8c334c6c",
                             "vmInstanceUuid": "c5a966cb87d644649952daf683f89e26"
                         }
                     ],
                     "zoneUuid": "4a3a78b1b9f049948b79cf9e667f0af2"
                 }
             ],
             "success": true
         }

         >>>DestroyVmInstance uuid=c5a966cb87d644649952daf683f89e26
         {
             "success": true
         }
8. Reconnect all hosts
         >>>QueryHost
         {
             "inventories": [
                 {
                     "availableCpuCapacity": 7180,
                     "availableMemoryCapacity": 1997570048,
                     "clusterUuid": "4282fb61aa55458ea160de138e130298",
                     "createDate": "Jan 30, 2016 2:51:13 PM",
                     "hypervisorType": "KVM",
                     "lastOpDate": "Jan 30, 2016 3:03:20 PM",
                     "managementIp": "192.168.200.187",
                     "name": "host1",
                     "state": "Enabled",
                     "status": "Connected",
                     "totalCpuCapacity": 7182,
                     "totalMemoryCapacity": 2098233344,
                     "username": "root",
                     "uuid": "402f8304a50c410486e023512492316b",
                     "zoneUuid": "4a3a78b1b9f049948b79cf9e667f0af2"
                 },
                 {
                     "availableCpuCapacity": 14363,
                     "availableMemoryCapacity": 8321593344,
                     "clusterUuid": "10409d3e33b249c19746022930a541c7",
                     "createDate": "Jan 30, 2016 3:03:14 PM",
                     "hypervisorType": "KVM",
                     "lastOpDate": "Jan 30, 2016 3:03:52 PM",
                     "managementIp": "192.168.200.150",
                     "name": "host2",
                     "state": "Enabled",
                     "status": "Connected",
                     "totalCpuCapacity": 14364,
                     "totalMemoryCapacity": 8371924992,
                     "username": "root",
                     "uuid": "415fa093b34e4a3d873368104b127115",
                     "zoneUuid": "4a3a78b1b9f049948b79cf9e667f0af2"
                 }
             ],
             "success": true
         }

         >>>ReconnectHost uuid=402f8304a50c410486e023512492316b
         {
             "success": true
         }

         >>>ReconnectHost uuid=415fa093b34e4a3d873368104b127115
         {
             "success": true
         }